Wednesday, July 7, 2010

The PhoTOYgraphy Gears

I was browsing through a colleague's (Shaun Wong) blog site and saw that he posted his equipment set up and thought about doing the same. Since this is more of a photo than a toy review I want to show that you do not need top of the line equipment to achieve good photos. 


The Main:
First of is obviously the camera. I have tried both Canon and Nikon and to be honest both are the same. It's a matter of brand preference. However there are certain things that I like with Canon that cannot be found on Nikon and vice-versa. I will not mention other brands because I did not have the privilege of owning them.


I use a Canon 5D Mark II and an IR converted Canon 30D (courtesy of my good friend Jimmy).
IR Converted 30D
The Bodies:
For the IR camera I use a Canon 17-40mm f4 L lens (pictured above) which is good for landscape shots. Because of the nature of the lens you can shoot your subject up close and get 'comical' pictures.

For most of the pictures that you see on this blog they were taken with a Canon 100mm f2.8 macro lens (pictured below).


Sometimes I tend to move far away from the subjects when they are big (space restriction on my room) so I use a Canon 70-300mm f3.5-5.6 lens instead (pictured below).


The Lights:
I am fortunate enough to have a good friend (Jimmy once again) who lets me use his strobes for my toy shots. Since he owns 2 big strobes he lets me play with these small ones  to which I have to say are perfect for table top PhoTOYgraphy.

First we have a 180 watts Jinbei strobe that is being sold as a set with stands, an umbrella, a softbox and a grid. You can purchase this as a basic starter lighting kit locally at Aperture Trading for about P 16,500.00. In my experience Jinbei is more durable than what I previously used and I would highly recommend this.


The Accessories:
One of the most useful accessories for me is a grid. It basically narrows the light and creates a circle like effect on the subject. This grid is attached on the top of one of the Jinbei lights.

All these things are useful but to fire them remotely you will need a trigger of some sort. There is an IR trigger which is inexpensive and easy to use and remote triggers which are expensive and sophisticated. 

One such IR trigger that I use is a brand called Morris (I took of the sticker and replaced it with my own) which works flawlessly most of the time. An IR trigger is usually bundled with the Jinbei set.


If you do not mind spending extra then the more sophisticated remote trigger is a lot better. Sometimes I use my Pocket Wizard Flex TT5 and Mini TT1 (almost P 20,000.00 for the set) instead of the IR trigger. Usually the Morris IR trigger works with my studio setup so I keep my Pocket Wizards in the bag. Sometimes I prefer to use them when I need a more complexed setup.


One last thing that I always have is a flash light or pen light. This is a useful tool for light painting (to which I credit Mr. Jo Avila for teaching me this technique). Some pictures of Phoenix, Dark Phoenix and Kotobukiya Batman were shot using a flash light. Jo prefers a push button flash light so you can turn it on and off quickly and I completely agree with this. 

You can also put colored gels or transparent papers in front of the flash light to create colored lights.

I bought a product table (Falcon Eyes, P 4,400.00) for table top photography and PhoTOYgraphy. The table collapses for storage and has a transparent like bendable platform that you can adjust.This bendable platform makes for a seamless background and also light can pass through it.

Finally, this is what my setup looks like. You can see the softbox on the right side of the product table and all 3 lights are being used.


Using the setups pictured above this is what you get:


You can position the lights differently and get interesting results. All it takes is a bit of research and a great deal of patience.

Hope this helps!

Monster's Inc. by Takara Tomy

All or most kids (boys) loved to play with die cast cars including yours truly. My 3 ½ year old son loves it when he gets a toy car as a gift or when we sometimes go toy shopping. I myself am a fan and have acquired a small collection (which are still sealed) through the years. With so many brands and variants to choose from it is impossible to collect all of them (unless you are very resourceful and wealthy) so I just buy what I want.

A friend of mine who collects almost anything recently bought these die cast cars by Takara under the Tomy line. Takara is a well-established Japanese company that manufactures good quality toys and these cars are examples of good craftsmanship. I’ve known the name Tomy more than 15 years before when I had my first Zoid. You can read more of the company at http://www.takaratomy.co.jp/company/english/.

Packaging:
I was loaned 2 boxes of Monster's Inc. (Mike and Sully) themed die cast cars with Japanese inscriptions on them. Aside from the picture of the car each box is labeled with a code number.

Collector's Perspective:
There is a saying once a collector always a collector. These Monster's Inc. cars are collectibles in my book and though they are not that expensive compared to a lot of other toys out there I would rather have these on display than to play with it. Or maybe I can buy 2 sets of each and have a set for my son to play with and the other at my display cabinet.

My friend bought these locally for P 329.75 each.I have been scouting the internet where these can be purchase and so far I found a couple of Japanese sites and one in ebay. You can also check their website (http://www.takaratomy.co.jp/) for details.

PhoTOYgrapher's Perspective:
A die cast car dressed as Monster's Inc. characters? I love it. As usual I would suggest the outdoor shoot treatment for these cars. Table top shots are nice if you can incorporate a background for them so as not to make the photos too simple (like mine). There are no moving parts so there is not much you can do aside from shooting from different perspectives.


Gears used:
Canon DSLR
Canon 100mm f2.8 Lens
3 pcs. Jinbei 180 watts (each), Softbox and Grid
Benro A300 Tripod
Falcon Eyes Product Table

Toy Story & Beyond by Takara Tomy

All or most kids (boys) loved to play with die cast cars including yours truly. My 3 ½ year old son loves it when he gets a toy car as a gift or when we sometimes go toy shopping. I myself am a fan and have acquired a small collection (which are still sealed) through the years. With so many brands and variants to choose from it is impossible to collect all of them (unless you are very resourceful and wealthy) so I just buy what I want.

A friend of mine who collects almost anything recently bought these die cast cars by Takara under the Tomy line. Takara is a well-established Japanese company that manufactures good quality toys and these cars are examples of good craftsmanship. I’ve known the name Tomy more than 15 years before when I had my first Zoid. You can read more of the company at http://www.takaratomy.co.jp/company/english/.

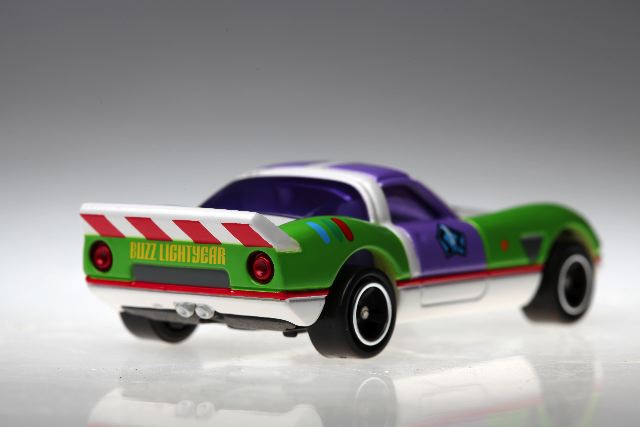
Recently, Disney Pixar released Toy Story 3 and Takara Tomy jumped in on the merchandise as well (http://jp.newses.net/news/article/id/3a03cca8043c33a45669e4d3e08adbe0/). 


Package Contents:
I was loaned 3 boxes of Toy Story themed die cast cars with Japanese inscriptions on them. Aside from the picture of the car each box is labeled with a code number (example Woody is DM-14, Buzz is DM-13 and the Aliens is DM-15).


Collector's Perspective:
There is a saying once a collector always a collector. These Toy Story cars are collectibles in my book and though they are not that expensive compared to a lot of other toys out there I would rather have these on display than to play with it. Or maybe I can buy 2 sets of each and have a set for my son to play with and the other at my display cabinet.


My friend bought these locally for P 329.75 each.I have been scouting the internet where these can be purchase and so far I found a couple of Japanese sites and one in ebay. You can also check their website (http://www.takaratomy.co.jp/) for details.


PhoTOYgrapher's Perspective:
A die cast car dressed in Toy Story character? I love it. As usual I would suggest the outdoor shoot treatment for these cars. Table top shots are nice if you can incorporate a background for them so as not to make the photos too simple (like mine). There are no moving parts so there is not much you can do aside from shooting from different perspectives.
Gears used:
Canon DSLR
Canon 100mm f2.8 Lens
3 pcs. Jinbei 180 watts (each), Softbox and Grid
Benro A300 Tripod
Falcon Eyes Product Table

Monday, July 5, 2010

OptiMunny Prime by Jan Calleja

If you are an avid vinyl toy collector then you have probably heard of the term "Munny." Basically it is blank piece of vinyl where you can customize it by doodle, painting, airbrush or sculpting etc. (kindly refer to the picture on the right). This is a popular hobby around the world where customizers showcase their talents by turning Munny into a masterpiece. Do a Google of custom munny and you will see numerous threads with pictures of works by talented artists. Enter Jan Calleja.


I first saw his customs last year at our annual Philippine ToyCon and was instantly amazed (http://www.flickr.com/photos/powerpee/sets/72157621853121211/). I immediately contacted and inquired about the prices. I did not purchase any of the customs because they are more than what I can afford. On the other hand I did complement and praised him for his excellent work. I also remember drooling over his Iron Man custom munny, which was the highlight of his collection.


One year after Toycon Jan and I remained in contact with each other via our flickr accounts. A few weeks ago I asked Jan if he wanted me to take pictures of his OptiMunny Prime and he agreed. The fact that Optimus Prime is my favorite Transformer made it even more enjoyable for me. After 2 weeks Prime finally arrived in my office and when I saw it my jaw dropped.


Packaging:


Jan sells his customs locally and abroad. Prime arrived to me bubble wrapped inside a sturdy box.


Collector’s Perspective:
You can buy a blank Munny for about P 1,250.00 here ($24.95 US) and try to think of ways to make it look like a piece of art, or you can purchase one of Jan’s customs. People put a lot of time and effort into customizing these masterpieces so I do consider them as collectibles. There are 2 push button switches at the rear of Prime’s head that activates the lights in his eyes. One word, AWESOME!


I asked Jan to give me some details on what he used to build Prime and this is what he said:

“It’s a 7inch munny DIY customized with some old scale model parts; scratch materials such as old credit cards, screws, metal washers… and epoxy. I used acrylic epoxy as primer then finished it with tamiya paints.”

There are toys for play and toys for display, this is intended as a showcase.


Some Issues:
1.) It’s a delicate piece with all the miscellaneous parts attached via super glue so extra care is needed.
2.) The paint job is already good but I feel it would be a lot better if he uses airbrush (Jan informed me that he is now practicing airbrushing).
3.) The LED eyes of Prime are designed to be disposable so once it wears out Prime’s going to be blind (Jan informed me that he is going to do something about it).
4.) Because of the complexity of the work involved his head and arms are not movable anymore.

PhoTOYgrapher’s Perspective:
I have to say that viewing the pictures of Prime in my flickr account is nothing compared to seeing the actual item. Because I do not own this piece there are restrictions on what I can do with it. I would love to bring this to an industrial zone or maybe La Mesa Eco Park and give it a strobist treatment.

Needless to say my first IR (infrared) Toy shot is with OptiMunny Prime and though the sun was not on my side during the shoot I was able to get decent photos.


Take a photo of it below eye level and you make Prime look huge and powerful.


The details are amazing so I took photos of portions of Prime’s body. The LED light is a definite plus factor with this custom. I have been a fan of Prime since he first came into television and seeing him evolved through the years then finally having a movie is a dream come true. Jan patterned his custom with the movie version Prime.


OptiMunny Prime and Mighty Mugg Prime

For more pictures kindly check my flickr account:
http://www.flickr.com/photos/powerpee/sets/72157624291404313/


You can contact Jan at the ff:
email: chilikala@yahoo.com
mobile number 0922-8817844 
flickr site (http://www.flickr.com/photos/30677525@N07/)

Gears used:
Canon DSLR
Canon 30D (converted to IR)
Canon 100mm f2.8 Lens
Canon 17-40mm f4.0 Lens
3 pcs. Jinbei 180 watts (each), Softbox, Grid and IR Trigger
Falcon Eyes Product Table

Saturday, July 3, 2010

Series 1 Collectable Mini Figures (Part 1) by LEGO

I first heard about this from my brother who is a LEGO fan. The company followed the ever-popular vinyl toy line where you buy blind boxes and don't know what is inside. There are pictures on the side of the box depicting that characters that you can get and the ratio (how hard to get it). Collectors spend a lot of money with this concept because they are trying to complete the whole set.

Enter LEGO. The company released its series 1 of collectable mini figures. For more info kindly check http://www.brothers-brick.com/2010/01/22/lego-8683-collectable-minifigures-coming-june-2010-news/.

Package Contents:
Each pack contains a figure with an accessory or accessories and a stand and runs for $2.00 a piece. There are currently 16 characters to collect within the 1st series.

Collector’s Perspective:
Once a LEGO fan always a LEGO fan. I would gladly starve myself for a week to be able to buy a whole case and try to complete these cute figures. These may not be worth a lot someday (unlike those high priced vinyl’s) but the fact that they are cute already makes them a collectible in my book. I have several LEGO boxes stashed that I have not yet opened for more than a year now.

According to my brother they are hard to find (sold out in HK and Singapore when we inquired) but he is determined to get them. I myself am determined to complete the whole series. 

Now if you check the link above you will notice that these LEGO figures are packed in a way that you will not know what character you are getting, which would make you want to buy more and put a big hole in your wallet.

Well my brother’s not one of those (sometimes he is) so he did some research and found out that you can distinguish each character by carefully analyzing the bar code on the packaging. In short each character has its own unique bar code and he even printed it out for reference. He had a relative (from the U.S. who did not know about the code) bought 5 packs and he only got 2 characters (3 Ninja and 2 Caveman). 

PhoTOYgrapher’s Perspective:
Being a flickr member (http://www.flickr.com/) for a few years now, I have several colleagues who do LEGO toy shoots and their pictures are amazing. To me its creativity at its best and these people are geniuses.


You can check their flickr streams at:

I love the fact they are small you can practically take them anywhere. Also with the thousands of LEGO accessories available you can make awesome dioramas. The only thing that is holding you back is your imagination.

Gears used:
Canon DSLR
Canon 100mm f2.8 Lens
3 pcs. Jinbei 180 watts (each), Softbox, grid and Gray Background
Falcon Eyes Product Table

Tuesday, June 29, 2010

Batman by Kotobukiya

If you were given a license to do any character in the DC universe, who would you choose ?

There are 2 characters that comes to mind – Superman and Batman. Though I was not happy with Koto’s rendition of Superman, their Batman is absolutely fantastic! I could probably spend hours thinking of ways how to PhoTOYgraph this excellent piece. Even the posing is magnificent! I am and will always be a Superman fan but this is one exception that would make me want to own one.


Packaging:
Batman’s packed in a huge blister type box together with his stand. Congratulations to the people who did the artwork on the box.


Collector’s Perspective:
If you are a Batman fan then you definitely do not want to pass this up. This is by far the best Batman figure for me (my humble opinion of course) and there are a few out there who might come close. The way he is posed is simply spectacular and I love the way the figure is painted. It shows Batman at his best! 


This is a sold out item already here in the Philippines. A good friend of mine got this from another friend who decided to give it up after a few years (lucky new owner). I searched Amazon and got several hits with different prices which is weird. It retails for about $ 199.95 (http://www.amazon.com/gp/product/B00192KNDM/ref=s9_simh_gw_p21_i1?pf_rd_m=ATVPDKIKX0DER&pf_rd_s=center-2&pf_rd_r=0GHQ1XR3KGTBQ4WK76JG&pf_rd_t=101&pf_rd_p=470938631&pf_rd_i=507846).


Some issues:
1.) It is almost perfect but not pose able.
2.) It would have been nice if Kotobukiya did a variant piece with a black and gray color scheme.
3.) A Robin figure that complements this excellent piece would have been nice.


PhoTOYgrapher's Perspective:
My amateur skill does not do justice to this fine piece. Even though this is not pose able, with proper lighting you can achieve awesome results. Bring this figure on top of a building and do a night shoot with the moon on it back and it will look fantastic !


I love how the people at Kotobukiya paid attention to Batman's details and paint job quality (which shows in the pictures). Even the cape that wraps around his body is well 
thought of.

For more pictures kindly check my flickr site

Gears used:
Canon DSLR
Canon 100mm f2.8 Lens
3 pcs. Jinbei 180 watts (each), Softbox, Grid and Gray Background
Pen Light/Flash Light
Falcon Eyes Product Table
Custom Base

Disney Pixar UP! by Hot Toys

Whenever Disney Pixar comes out with a movie there is an almost 100% it will be a hit. Movies such as Toy Story and CARS are just a few of what makes them successful. Enter their latest addition, which is entitled UP. This is a story of an old balloon salesman, Carl Fedricksen, who fulfills his dream of adventure when he ties thousands of balloons to his house and flies away not knowing that he has a stow away: 8 year old Russell who is a Wilderness Explored.

Hot Toys is a company known for producing excellent quality toys and UP is another addition to their great line of CosBabies (check out their Iron Man movie line).

Packaging:
Carl and Russell are packaged in a blister type box with a colorful theme design from the movie. The package also contains Carl’s tennis ball like cane and a backdrop, which was used in the movie.

Collector’s Perspective:
If you are into collecting CosBabies (3 inch toys with big heads and small legs) then this is definitely for you. You can relive the movie with Carl and Russell standing inside your display cabinet. The details here are excellent and the paint job is very nice. Kudos to Hot Toys!


Sideshow Collectibles is selling the set for $ 14.99 (https://www.sideshowtoy.com/?page_id=4489&sku=900585), however it is sold out already.  I was able to get this locally for P 1,200.00.

PhoTOYgrapher’s Perspective:
When my friend loaned me these two I had a great time shooting them both. I’ve also shot the Iron Man CosBabies before so I am quite familiar with how you can move the head, arms, legs etc. I was trying to move/tilt the head of Carl when the neck suddenly snapped. I immediately called my friend (owner) who was a bit puzzled why the head could not be moved. Good thing I was able to buy another set to replace it (risks of taking pictures of toys that are not yours). Instead of having none I know own Russell and Carl (whom I fixed) and will have them join the Incredibles family at home.


CosBabies are a bit pose able and you can get away bringing it outdoors and not having people stare at you when taking pictures of them. The fact that these 3 inch figures are small you can practically take them anywhere. And since the details are good macro shots will do these figures justice.


Gears used:
Canon DSLR
Canon 100mm f2.8 Lens
3 pcs. Jinbei 180 watts (each), Softbox and Grid
Falcon Eyes Product Table
Custom Base